Stampin Up!

Candy Cane Holiday cards

This card was made with the Candy Candy Season bundle item number 149927. The card base is Whisper White cardstock cut at 8 1/2 by 5 1/2, scored at 4 1/4. The next layer is Shaded Spruce cardstock cut at 4 by 5 1/4. The designer series paper is the So Santa Workshop, I cut it to 3 3/4 x 5. Cut a stitched circle in whispers white, stamp the candy cane in Poppy Parade ink. The bow is stamped in Shaded Spruce ink. Both are cut out with the Candy Cane punch. I used the Garden green twine to make then bow and used the real red rhinestone to decorate the card.

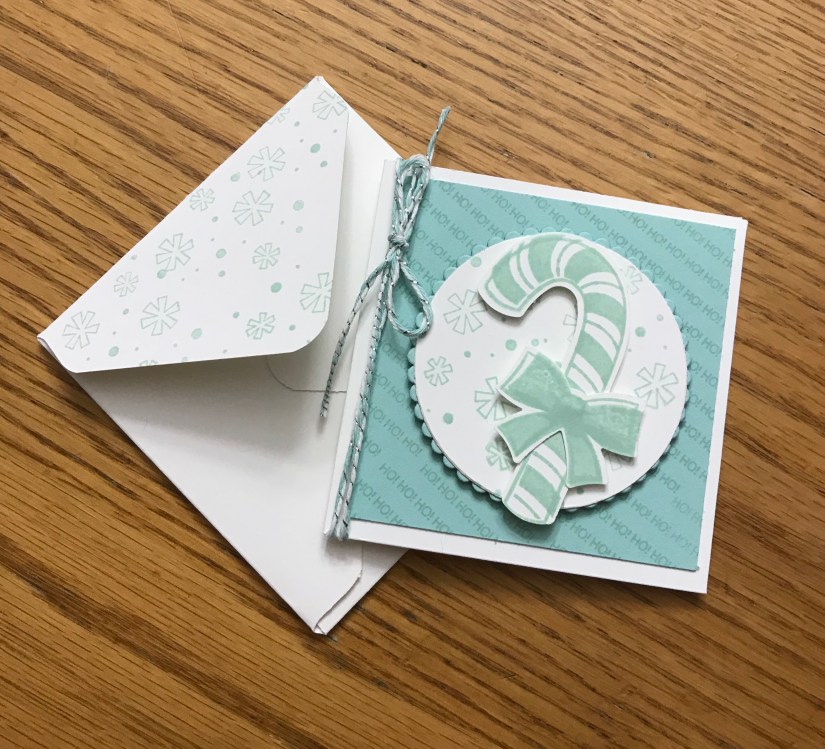
This card is a 3 by 3 card, perfect for holiday thank you cards or for gift tags! The base of the card is 3 by 6 and is scored at 3 inches. The next layer is a piece of pool party cardstock 2 3/4 by 2 3/4. I stamped the Ho! Ho! Ho! on the cardstock with pool party ink. I stamped the snowflakes in pool party on a piece of white cardstock cut in a circle and layered it with a scallop circle in pool party. I tied a bow with the blue and white twine. The candy cane and bow are both stamped with pool party ink and cut out with the candy cane punch.

Stampin Up!

So Santa Christmas Card

Super cute holiday card, I used whisper white card stock that measures 8 1/2 by 5 1/2, scored at 4 1/4. I then added a piece of the candy cane looking paper from the Santa’s Workshop designers series paper. The vellum is measured at 3 3/4 by 5 and went through the big shot with the Softly Falling Textured Impressions Embossing Folder. I stamped the Santa in memento black ink and used the Stampin blends to color him. The circle is cut out with the stitched dies, layered with a scallop die.

Ho Ho Ho Who needs snow is set on Cherry Cobbler cardstock cut at 8 1/2 by 5 1/2 scored at 4 1/4. I used the All is Bright designer series paper and cut a piece of the green paper to 5 1/4 by 4. The smaller piece of cherry cobbler paper (3 by 4) went through the big shot with the swirls and curls embossing folder. I stamped the Santa in mementos black ink and colored him with the Stampin blends. He is cut out with the stitched oval framelits and layered on a scallop piece of shaded spruce paper.

Stampin Up!

Christmas card

Super easy Christmas cards using the Festive Farmhouse paper and the Tin Texture Embossing Folder.  The base of the card is 5 1/2 by 8 1/2 and scored at 4 1/4.  I used the Cherry Cobbler cardstock and the Gray Granite cardstock.  The embossed piece is 5 1/4 by 4 inches and is in the same color as the cardstock.  One card has a full sheet the other I cut the embossed piece in half.  The designer series paper is 5 1/4 by 4 and just like the embossed piece, one is cut in half.  See the close up photos below to get a better idea on how to lay out each card.

Here is a close up of the red card

Here is a close up of the gray card.

I stamped the Merry Christmas from the Many Blessing Stamp set on Whisper White paper and cut out with the stitched framelit dies.  I used the circle scallop layering die in the coordinating color cardstock to crate a base for the greeting.  On the gray card I used a gem and on the red card I tied a bow with the cherry cobbler twine.

The supplies used to make these cards is listed below:

Stampin Up!

Frosted Floral cards


I created these cards as a cute fall everyday card.  You can create this card and send to just about anyone who needs a little lift me up.To make both cards I used the Tranquil Tide card-stock for the green cards and the Blackberry Bliss for the purplish card.  Both card-stocks measure at 5 1/2 by 8 1/2 and they are scored at 4 1/4.  I used the whisper white card-stock as a mat and that measures at 5 1/4 by 4.  The designer series paper is 3 3/4 by 5 inches.  I used the stamp set Wishing You Well and stamped the wheat looking stamp on whisper white card-stock.  I then used the layering oval framelits dies to cut out the stamped image along with a matching cardstock to layer underneath the white cut out. I stamped the greeting a a 1/2 piece of whisper white paper and used the banner punch on both sides to create the dove tails.  I used the coordinating color cardstock to create a boarder around the greeting.

Items used to create this project:


Uncategorized

Card Class

Halloween card class is going on now until October 15th. Class is $15.00 or free with a $25.00 purchase at my Stampin Up! Store. http://www.teresascully.stampinup.net

You will get the paper and embellishments to make these 4 cards. The Stamp set is not included. Once an order is made for the class I will ship the supplies and send you a pdf on how to create these cute cards. If you wish to take this class let me know by sending an email to tsstamping@gmail.com

Halloween, Stampin Up!

Halloween box and card set

Here is the cute boxes and card set I made on Saturday. You can use any cardstock and paper when creating this project. To make the box you will need a 8 by 8 solid color cardstock for the bottom part and a 6 by 6 designer series paper for the top of the box.  The bottom of the box you will score on all sides at 2 inches and the top of the box  is scored at 1 inch on all sides.  After you score you will cut on one side two lines going up to the score line running across (See photos)  You will cut on two side of the paper at opposite ends.

Once you are done cutting you will put tear and tape on the short ends and fold the ends up and attach to the larger piece of paper.  The same method is used to create to top of the box. Make sure you use a good adhesive to hold the box together.

To make the card, you will need a card base at 8 1/2 by 5 1/2 scored at 4 1/4. The designer series paper on the first card is 5 1/4 by 4 and the second card is 5 1/4 by 2 1/2. I applied the glittered organdy ribbon and stamped the greeting. I used the 2 inch circle punch to punch out the greeting and the starburst punch to cut the black foil paper. They are applied to the card using dimensionals. See supply list below, they can be ordered at: http://teresascully.stampinup.net  If you have any question on how to make this cute project feel free to contact me. Be sure to post your project to my Facebook group, I can’t wait to see them!!

Stampin Up!

Abstract Impressions Cards

This is the Gorgeous card I created last week on my Facebook live.  I enjoyed the spring time flowers and truly enjoyed making the layered card with this stamp set.  Purple is my favorite color and the Gorgeous Grape and Highland Heather papers go well together. You can change the layers and put the darker purple which is the Gorgeous Grape or the lighter purple first.  It’s up to you and how you want to create this card.  When stamping the images I stamped the lighter colors first, then layered the darker color second.

To Make this card you will need these supplies and measurements:

Basic Black cardstock at 8 1/2 by 5 1/2 scored at 4 1/4.                                                                    Gorgeous Grape  cardstock 5 1/4 by 4                                                                                                 Highland Heather cardstock 5 by 3 3/4                                                                                             Whisper White cardstock 4 3/4 by 3 1/2

The product supply will be lsited at the bottom of this post.

To make the inside of the cards you will need a 5 1/4 by 4 inch piece of cardstock, I used the Gorgeous Grape paper.  The Whisper White paper is 5 by 3 3/4

Products used in this project, they can be ordered at:  http://teresascully.stampinup.net

Uncategorized

Best Route Thank you Card

This is the card I made from my face book live video. To make this card you will need the following Stampin Up! items:

  • Blueberry Bushel Cardstock 8 1/2 x 5 1/2, fold in half
  • Mango Melody Cardstock 4 x 5 1/4, 2 one for outside and one for inside
  • Best Route DSP, a blue shade 3 3/4 x 5 and the stripe sheet at 1 x 5
  • Pineapple punch ribbon
  • Whisper White 3 x 3 for greeting and 3 3/4 x 5 for inside greeting.
  • Mango Melody Cardstock 3 1/4 x 3 1/4
  • One for All Stamp Set
  • Around the corner stamp set
  • Mango Melody Ink
  • Blueberry Bushel Ink
  • If you need any help ordering, let me know. The video is on my Facebook page, I will try to load it here so you may view it.
  • Halloween, Stampin Up!

    Paper Pumpkin

    Stampin Up! offers a great monthly subscription called Paper Pumpkin.  This is a kit you get that may contain cards, gift bags, gift tags, or some other cute paper crafting project.  The great part is you get everything you need to create your project.  The paper, envelopes, embellishments, a stamp set, and a mini ink pad.  This is a great way to create your own projects especially if your new to the craft and don’t know where to start.  Stampin Up!  even offers specialty boxes every once in a while.  If you enroll between August 11th thru September 10th, you will get the special Halloween Paper Pumpkin box shown below.  If you have any question regarding placing an order just send me an email and I will be more than happy to help you.

    08.07.18_PP_SHAREABLE_NEW_SPOOKY

    Classes, Stampin Up!, Tone on Tone Cards, Uncategorized

    Class

    My first class will be on 8/26, you will be making 5 different cards, 2 of each, so it will be 10 cards total. The cost for this class is $20 or free with a $30 Stampin Up! order. This is a tone on tone card class featuring the 2018-2020 In Colors. I used the stamp set treat time, which is pictured underneath the sample of card for the class.  In the class you will get the card stock and embellishments to create these cards. You will need to purchase the stamp set and punches if you wish.  Registration for this class will be 8/10 thru 8/22. The class will be released on 8/26 and your kits will be shipped on 9/1. The class will be a private video and I will forward the link to the video once you have registered and paid for the class on 8/26.  After registration is closed I will order supplies and ship them on 9/1.

    To register for this class email me your name and address to: tsstamping@gmail.com or place an order at:  http://teresascully.stampinup.net/

    Other Supplies used in the class: